
Enterprise deployments are typically used for production environment. You can design your enterprise deployment as per your needs. An enterprise deployment can consist of distributed components or high-availability deployments configured with load balancers. Enterprise deployments are designed for more complex installation structures with distributed and redundant components and generally include load balancers.
Note: For load-balanced deployments, multiple active Web server instances and vRealize Automation appliance appliances cause the installation to fail. Only a single Web server instance and a single vRealize Automation appliance should be active during the installation.
Pre-requisite checker
Tip: If you clone an IaaS node, install MSDTC on each node after it has been cloned. When you clone a node that has MSDTC installed, its unique identifier is copied to each clone, which causes communication to fail. This may impact the installation.
Installation Procedure
Note: I highly recommend to take a snapshot on all the IaaS servers and both the vRA appliances before starting this deployment.
1. Open a Web browser and navigate to the vRealize Automation appliance by using its fully qualified domain name, https://<vra-appliance-fqdn>:5480/
Log in with the user name root and the password you specified when the appliance was deployed.
2. The Installation Wizard as shown below will appears the first time you log in to the appliance. This wizard will be there even after you close the window and want to continue later on. As long as you don't click on cancel.
Note: If you click cancel at any point, the Wizard will not come back again after re-login. However, running the command below on the vRA appliance, will get the wizard activated from the same place you left it.
# vcac-vami installation-wizard activate
Click Next

3. Read and Accept the EULA and click Next.

4. Here you can choose the type of deployment, minimal or Enterprise. It will also give you the information about the server components to be deployed for Enterprise deployment. I selected Enterprise.
Also make sure to select "Install Infrastructure as a Service" check-box. And click Next.

5. Now here, you will need to install the management agents on all the IaaS servers. The moment you install the agents the server fqdn will start popping here. You can check out the link below to see how to install it, its very simple.
Install this agent on all Windows IaaS servers except DB server.
vRA7 Management Agent Installation

6. Atleast one additional vRA appliance is required to get this setup complete. This is required for Enterprise deployment. This is for HA purpose.
Add its 'fqdn' and credentials. Click Next.

7. Here, match the appropriate roles to the IaaS servers. This is all self explanatory. Click Next.

8. Click on 'Run' to start the pre-requisite checker. Here it will check all the pre-requisites on the IaaS servers. If you see any errors during installation then click on 'Fix' to let vRA fix the errors. Servers will reboot during this time.
If you want to fix the errors manually, then click on Show details that will have all the steps about error fixing.
When you see all green OK, Click on Next.

9. Here enter the FQDN of the vRealize Load Balancer (No IP allowed).

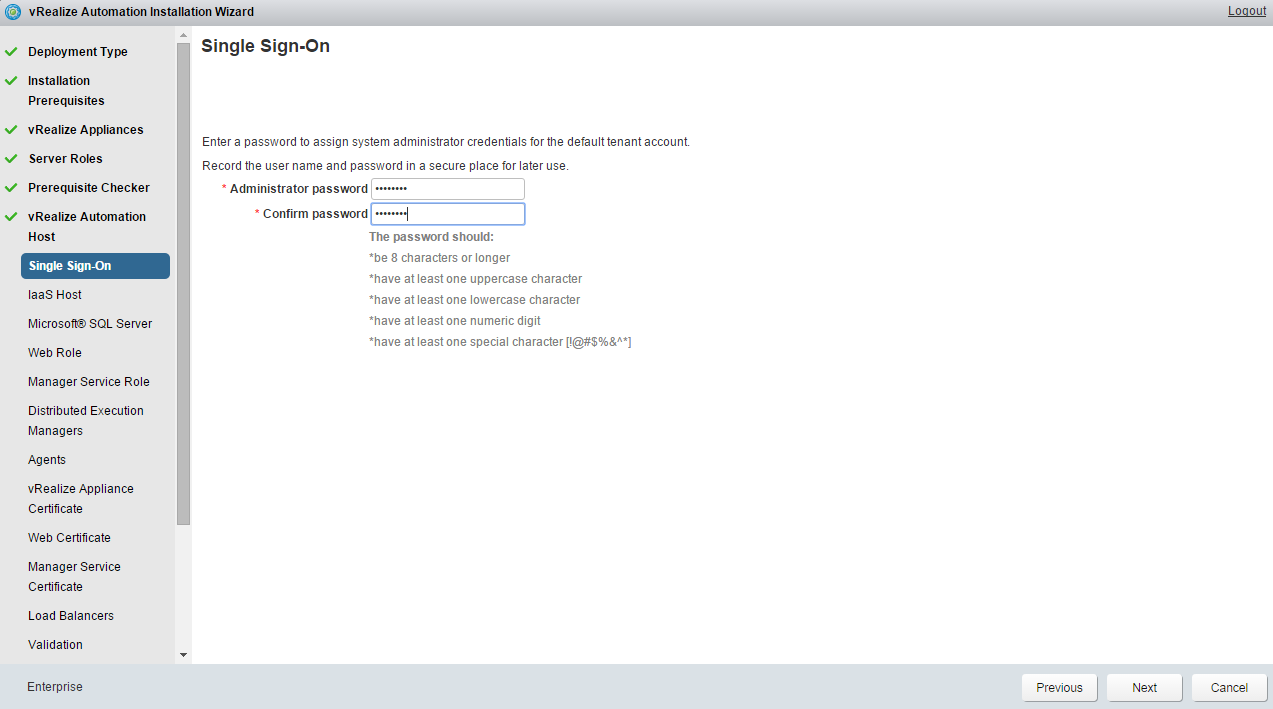
10. Enter the password to assign system administrator credentials for the default tenant account.

11. Enter the IaaS Web and Manager Load Balancer FQDN.
Also enter the Database security password. This password is required to restore database
information in the event of a system failure or to add components after initial installation. Without this password, you cannot restore successfully.

12. Enter the Database details here.
Server name: Database server FQDN.
Database Name: the Database instance that vRA will create for you.
Choosing 'Create new database' will create the new Database for you using above information.
If you choose second option which is 'Use existing empty database' then the DB instance must be already created with sufficient permissions (sysadmin) in DB.

13. Specify the Credentials for the Web server role.

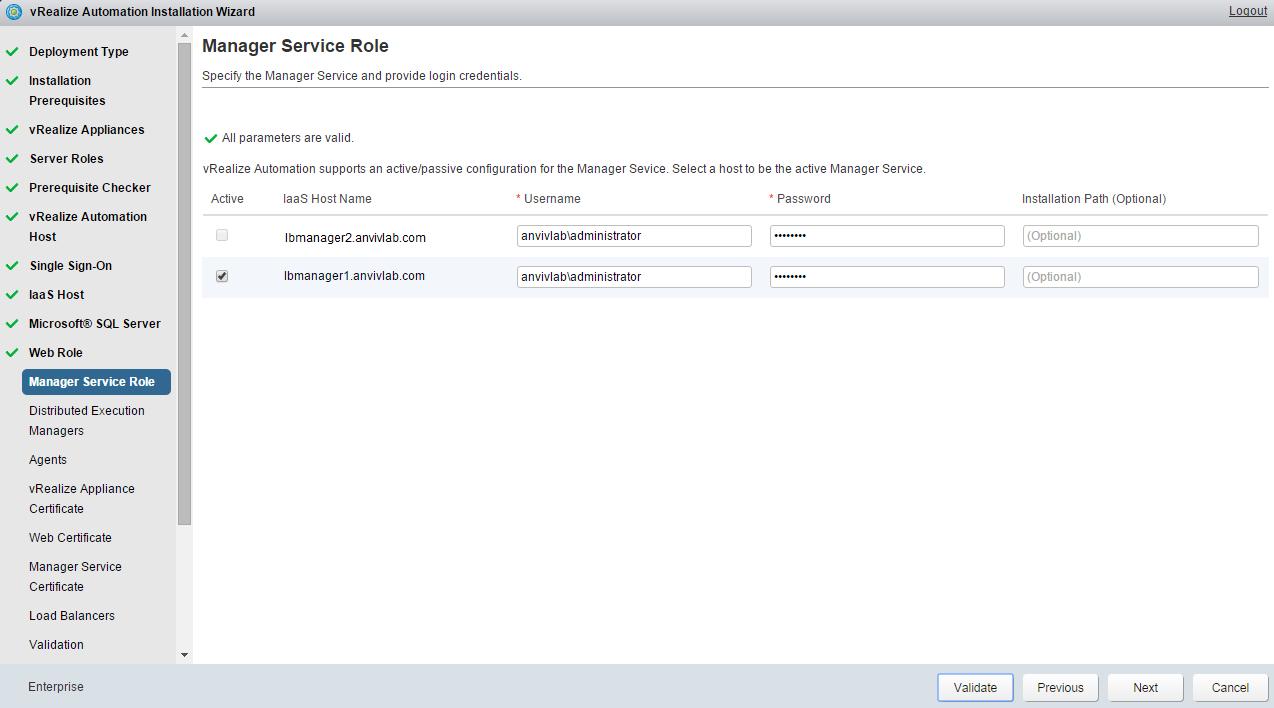
14. Specify the Credentials for the Manager server role. Select the active member as well which is typically the first node.

15. Specify the Credentials for the DEM. Also give instance a name.

16. Provide 'Agent' and 'Endpoint' name along with Credentials. Remember these settings since these will be used during the IaaS configurations.

17. For vRA Certificate: Select the 'Import' option and then enter the *.key certificate in the first box. And *.pem certificate key in the second box. Click Import. If certificates are generated correctly then you should see the screen below.
Click Next.

18. For Web Certificate: Select the 'Import' option and then enter the *.key certificate in the first box. And *.pem certificate key in the second box. Click Import. If certificates are generated correctly then you should see the screen below.
Click Next.

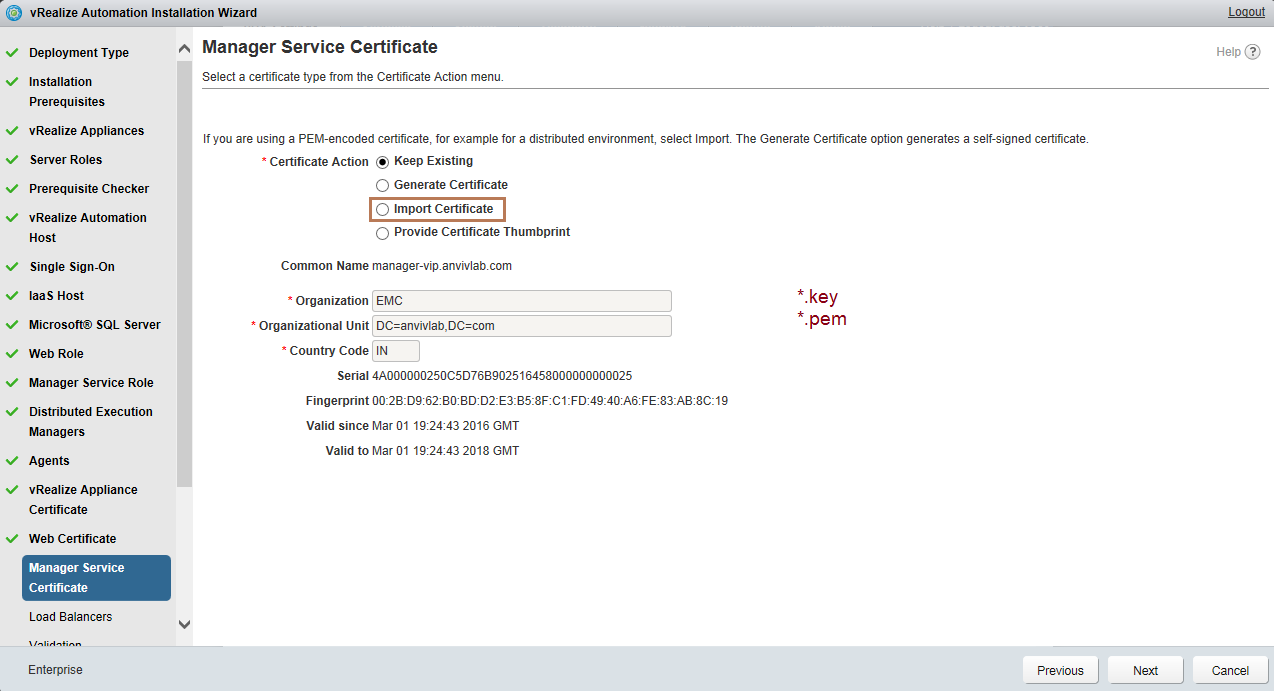
19. For Manager Certificate: Select the 'Import' option and then enter the *.key certificate in the first box. And *.pem certificate key in the second box. Click Import. If certificates are generated correctly then you should see the screen below.
Click Next.

20. Verify the Load Balancer information on this page. Make sure the information matching the Load Balancer servers.
Click Next.

21. Click on the 'Validate' here to validate all the information being provided. All must be green before proceeding.
This takes fair amount of time. So sit back and relax or grab a coffee.
Once all looks good then click Next.

22. Take another snapshot for every single component here before proceeding further (Excluding DB server). Then click next.

23. Finally we are there, click Install to begin installation.

24. After some time you will see installation successful, if you haven't done any mistake. Click Next.

25. Enter the License here and click next.

26. This is optional. Click enable if you want to take part in it. Else click Next.

27. Optionally, you can start an initial content workflow for a vSphere endpoint. The process uses a local user called "configurationadmin" that is granted administrator rights.
A "configurationadmin" user is created and a configuration catalog item is created in the default tenant. This user is granted the following rights:


Note: For load-balanced deployments, multiple active Web server instances and vRealize Automation appliance appliances cause the installation to fail. Only a single Web server instance and a single vRealize Automation appliance should be active during the installation.
Pre-requisite checker
- Microsoft .NET Framework 4.5.2 is installed.
- SecondaryLogOnService is running.
- Microsoft Distributed Transaction Coordinator Service (MS DTC) enabled on all IaaS Webs, the Manager Service, and SQL servers in the system. MS DTC is required to support Database transactions and actions such as workflow creation.
- No firewalls between Database Server and the Web server or IaaS Servers.
- If using SQL Server Express, the SQL Server Browser service must be running.
- A 64-bit version of Java 1.7 or later must be installed. 32-bit versions are not supported.
- Load Balancer DNS entries must be pointing to active nodes of vRA, IaaS Web and IaaS Manager for deployment. Once installation is complete, change it to original.
Tip: If you clone an IaaS node, install MSDTC on each node after it has been cloned. When you clone a node that has MSDTC installed, its unique identifier is copied to each clone, which causes communication to fail. This may impact the installation.
Installation Procedure
Note: I highly recommend to take a snapshot on all the IaaS servers and both the vRA appliances before starting this deployment.
1. Open a Web browser and navigate to the vRealize Automation appliance by using its fully qualified domain name, https://<vra-appliance-fqdn>:5480/
Log in with the user name root and the password you specified when the appliance was deployed.
2. The Installation Wizard as shown below will appears the first time you log in to the appliance. This wizard will be there even after you close the window and want to continue later on. As long as you don't click on cancel.
Note: If you click cancel at any point, the Wizard will not come back again after re-login. However, running the command below on the vRA appliance, will get the wizard activated from the same place you left it.
# vcac-vami installation-wizard activate
Click Next

3. Read and Accept the EULA and click Next.

4. Here you can choose the type of deployment, minimal or Enterprise. It will also give you the information about the server components to be deployed for Enterprise deployment. I selected Enterprise.
Also make sure to select "Install Infrastructure as a Service" check-box. And click Next.

5. Now here, you will need to install the management agents on all the IaaS servers. The moment you install the agents the server fqdn will start popping here. You can check out the link below to see how to install it, its very simple.
Install this agent on all Windows IaaS servers except DB server.
vRA7 Management Agent Installation

6. Atleast one additional vRA appliance is required to get this setup complete. This is required for Enterprise deployment. This is for HA purpose.
Add its 'fqdn' and credentials. Click Next.
7. Here, match the appropriate roles to the IaaS servers. This is all self explanatory. Click Next.

8. Click on 'Run' to start the pre-requisite checker. Here it will check all the pre-requisites on the IaaS servers. If you see any errors during installation then click on 'Fix' to let vRA fix the errors. Servers will reboot during this time.
If you want to fix the errors manually, then click on Show details that will have all the steps about error fixing.
When you see all green OK, Click on Next.

9. Here enter the FQDN of the vRealize Load Balancer (No IP allowed).

10. Enter the password to assign system administrator credentials for the default tenant account.
11. Enter the IaaS Web and Manager Load Balancer FQDN.
Also enter the Database security password. This password is required to restore database
information in the event of a system failure or to add components after initial installation. Without this password, you cannot restore successfully.

12. Enter the Database details here.
Server name: Database server FQDN.
Database Name: the Database instance that vRA will create for you.
Choosing 'Create new database' will create the new Database for you using above information.
If you choose second option which is 'Use existing empty database' then the DB instance must be already created with sufficient permissions (sysadmin) in DB.

13. Specify the Credentials for the Web server role.

14. Specify the Credentials for the Manager server role. Select the active member as well which is typically the first node.
15. Specify the Credentials for the DEM. Also give instance a name.

16. Provide 'Agent' and 'Endpoint' name along with Credentials. Remember these settings since these will be used during the IaaS configurations.

17. For vRA Certificate: Select the 'Import' option and then enter the *.key certificate in the first box. And *.pem certificate key in the second box. Click Import. If certificates are generated correctly then you should see the screen below.
Click Next.

18. For Web Certificate: Select the 'Import' option and then enter the *.key certificate in the first box. And *.pem certificate key in the second box. Click Import. If certificates are generated correctly then you should see the screen below.
Click Next.

19. For Manager Certificate: Select the 'Import' option and then enter the *.key certificate in the first box. And *.pem certificate key in the second box. Click Import. If certificates are generated correctly then you should see the screen below.
Click Next.
20. Verify the Load Balancer information on this page. Make sure the information matching the Load Balancer servers.
Click Next.

21. Click on the 'Validate' here to validate all the information being provided. All must be green before proceeding.
This takes fair amount of time. So sit back and relax or grab a coffee.
Once all looks good then click Next.

22. Take another snapshot for every single component here before proceeding further (Excluding DB server). Then click next.

23. Finally we are there, click Install to begin installation.

24. After some time you will see installation successful, if you haven't done any mistake. Click Next.

25. Enter the License here and click next.

26. This is optional. Click enable if you want to take part in it. Else click Next.

27. Optionally, you can start an initial content workflow for a vSphere endpoint. The process uses a local user called "configurationadmin" that is granted administrator rights.
A "configurationadmin" user is created and a configuration catalog item is created in the default tenant. This user is granted the following rights:
- Approval Administrator
- Catalog Administrator
- IaaS Administrator
- Infrastructure Architect
- Tenant Administrator
- XaaS Architect
Click Next.

28. There you are. This completes the vRA7 installation.

You won't believe me, but I was planning to write a blog very similar to the one you have posted here. Great work!
ReplyDeletePython training In Navalur
AWS Training In Navalur