Since this is an Integration part so my assumption is that you have fair amount of experience with Infoblox IPAM NIOS appliance and vRealize Automation. Here I am going to use the recent release of vRealize Automation version 7.1 in this blog.
Inventory used in this blog,
4. Similarly here as well, select Yes to add the new IaaS host. Else select No if you already have added the IaaS host to vRO client.
If you creating a new IaaS host then specify the host properties, connection parameters and user credentials.
Click Next.
5. Now setup the Property group, specify the details for the default Infoblox IPAM property group.
Click Submit.
Note: All the steps above have their individual workflows in the Infoblox folder in vRO if they are needed to be run separately.
6. Verify the Workflow executed successfully.

5. The new "Property Definitions" are also added in the property dictionary.
Inventory used in this blog,
- Infoblox IPAM NIOS appliance 7.2.6-316673
- vRealize Automation 7.1
- vRealize Orchestrator 7.1
- Infoblox IPAM Plug-In for VMware version 4.0
- vSphere 6.0
Requirements,
- Compatibility information with the Infoblox IPAM Plug-In for VMware v.4.0 (Source - IPAM vRO Plugin Guide)
- Make sure to have NIOS is correctly licensed.
- To ensure that the cloud API service is functioning properly, open port 443 for HTTPS connectivity and configure your firewalls accordingly.
- Infoblox IPAM plugin v4.0 installed in vRealize Orchestrator.
- Cloud API users must be members of the cloud-api-only admin group under NIOS.
- Read permission to access Grid DHCP Properties
- Read/write permissions to the Grid members or associated appliance
- Networks and Ranges correctly defined in the DHCP.
- Extensible attributes setup in the NIOS.
- Valid NIOS SSL certificates are imported into vRealize Orchestrator.
Performing Basic Plug-In Setup in VRO
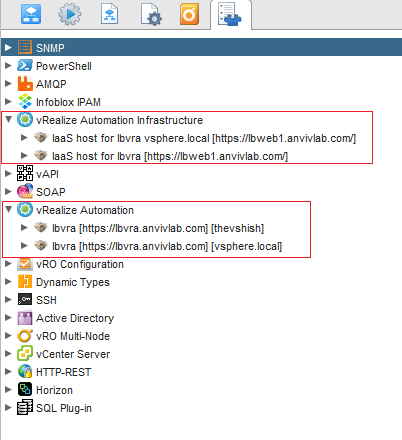
1. Login to vRO Client and Run the "Setup Wizard" workflow.
2. Select Yes to add the new vRA appliance. Else select No if you already have added the vRA host to vRO client.
Click Next.
3. Enter the SSO credentials as it by default uses the "vsphere.local" tenant.
4. Similarly here as well, select Yes to add the new IaaS host. Else select No if you already have added the IaaS host to vRO client.
If you creating a new IaaS host then specify the host properties, connection parameters and user credentials.
Click Next.
5. Now setup the Property group, specify the details for the default Infoblox IPAM property group.
Click Submit.
Note: All the steps above have their individual workflows in the Infoblox folder in vRO if they are needed to be run separately.
6. Verify the Workflow executed successfully.
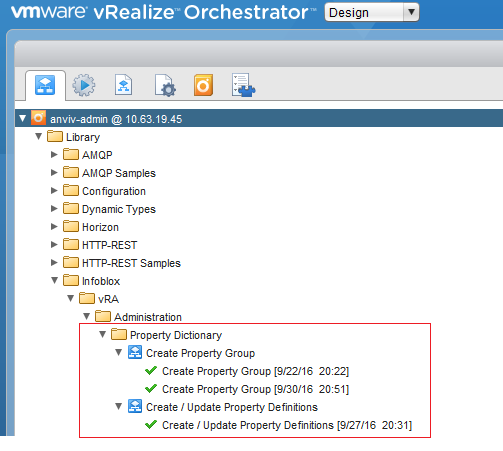
So what exactly the above "Setup Wizard" workflow did?

5. The new "Property Definitions" are also added in the property dictionary.
Configuring vRealize Automation
Here I will only show the topics relevant to IPAM setup. I assume Reservations, Groups, Blueprints, Entitlements, Catalog Items are already setup.
Configure vRealize Orchestrator Server
1. In vRA, click Administration –> vRO Configuration –> Server Configuration.
2. Choose one of the options. I chose the second option which is also recommended for production environments.
a. Select Use the default Orchestrator server that was configured by the system administrator.
OR
b. Select Use an external Orchestrator server.
c. Specify the server details.
3. Click Test Connection and Click OK.
Create vSphere and vRealize Orchestrator Endpoints
To allow vRA to communicate with the vSphere environment and discover its inventory we need to create a vSphere endpoint. After the vRA agent discovers the compute resources, create a vRealize Orchestrator endpoint. This allows vRA to communicate with vRealize Orchestrator and run custom workflows.
To create a vRealize Orchestrator endpoint we need to specify a vRO instance as an endpoint with which vRealize Automation communicates for VM provisioning.
1. Go to vRealize Automation and click Infrastructure –> Endpoints –> Endpoints.
2. Click New –> Orchestration –> vRealize Orchestrator.
3. Specify the endpoint details.
Note: For an embedded vRO, URL should be: https://<vro ip or fqdn>/vco
For an external vRO, the URL should be: https://<vro ip or fqdn>:8281/vco
4. Enter the Credentials that connects to vRO instance. This could be service account.
5. In Custom properties, click New.
Enter the property name “VMware.VCenterOrchestrator.Priority” and the value “1”.
Create an Infoblox IPAM Endpoint
When you create an Infoblox IPAM endpoint, you specify the master connection that vRA uses to communicate with NIOS. Inside the endpoint, you can add more connections and specify their priorities. You can create up to four failover connections. In the master connection, you specify the API type: WAPI or Cloud API.
1. In vRealize Automation, click Infrastructure –> Endpoints.
2. Click New –> IPAM –> Infoblox.
As we saw earlier the IPAM Endpoint button only came after running the "Setup Wizard" workflow in vRO. However, it can also be run separately using the "Register IPAM Endpoint" workflow in vRO in case required.
3. Specify the endpoint details. The address specified here is the master connection.
4. In Custom properties, enter the API connection type: Infoblox.IPAM.APIType = WAPI or Cloud API. I used Cloud-API here. Click the Save icon.
Note: The Infoblox.IPAM.APIType custom property is optional. If it is not defined, the WAPI API type is used by default.
5. Click OK.
Create an External Network Profile for IPAM
Now lets create an external network profile in vRA which will use the Infoblox IPAM endpoint and a specific network view and network range in NIOS.
1. In vRealize Automation, click Infrastructure –> Reservations –> Network Profiles.
2. Click New –> External.
3. On the General tab, specify the network profile details, including the name of the IPAM endpoint created earlier.
4. Click the Network Ranges tab. In Address space, select a network view on NIOS that is made available by the Infoblox IPAM endpoint.
The range you can see in above picture is the one defined in IPAM.
Make sure you have given the permission to the Cloud API user under this range or network. Else the "Address space" will not populate and you will not see the range.
5. Click OK.
Map the Network Profile in the Reservation
To edit a reservation,
1. Click Infrastructure –> Reservations.
2. Click on the Reservation so it will open it for editing.
3. Click on Network tab and select the Network profile we just created above against the Network path which is vSphere port group.
Click OK.
Setting Up Blueprint
Here like I mentioned earlier I assume that you already have a published Blueprint with all the required Entitlements setup correctly.
A Property Group and Property Definitions were created earlier in this blog when the "Setup Wizard" workflow was run in vRO. Property groups and Definitions can also be created manually by using their exclusive workflows in vRO if required.
1. Open the Blueprint Designer and drag the Network & Security from the Categories to the canvas.
2. Give it a Name and Click on Existing Network pop up tab.
3. Select the Network Profile we created earlier that is "IPAM-External". Click OK.
4. Click on your IaaS Machine blueprint to open it for editing.
5. Click on the Network Tab and click 'New' to add the network to the Blueprint.
6. Select the Network we created in step 2 above from the drop down. Click OK.
7. Click on the Properties tab.
8. Click on the 'New' button and select the Property Group we created earlier. Click OK.
9. Click Save and then Finish.
Add VMware Extensible Attributes in Infoblox IPAM
Extensible attributes (EAs) are identifiers that you use to locate and track an IPAM object, e.g. a host, network, or range. They are typically manually created by admins in the NIOS Grid Manager. Each attribute tracks specific information about the object. These details provide searchable metadata for network, asset, and service management.
For the integration of the Infoblox Plug-In 4.0 and NIOS with vRA, following extensible attributes must be created in NIOS,
• VMware resource ID (string type)
• VMware NIC index (Integer type)
Note: If these EA's are not added, your vRO workflows may fail.
DEMO
Lets see if whatever we did works or not.
1. Goto Catalog Items.
2. Click on General tab and verify the resources or any other customization settings.
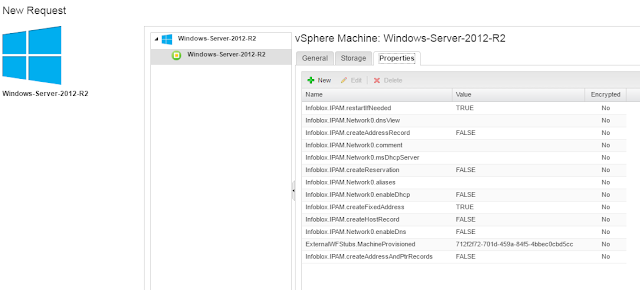
3. Click on the Properties Tab. Set the properties accordingly as per your requirements and IPAM setup.
Note: At least one of the following custom properties [createHostRecord, createAddressRecord, createAddressAndPtrRecords, createFixedAddress, createReservation] must be set to "True"
These properties can be edited in the Property Definitions under Administration --> Property Dictionary --> Property Definitions so you don't have to edit every time you request a machine.
4. Click on Submit.
It will run the vRO workflow "Allocate" to allocate the IP address to the VM in provisioning stage.
5. Monitor the request in the Request tab.
Now the VM is deployed successfully lets see what happened in IPAM and vCenter
a. VM details in VMware tenant In IPAM.
b. IP assigned in IPAM in the range.
c. VM deployed in vCenter.


I am very appreciative of this post. Very! Thank you so much. Will let you know soon if there were any issues with this config.
ReplyDeleteThank you ! :)
DeleteIs there a option to have a drop down instead of networks being hardcoded within blueprints. Like the following http://www.virtualjad.com/2016/06/add-a-network-selection-drop-down-in-vra-7.html
ReplyDeleteJust tested it and it looks like it does work if your VDS portgroup does not have a "/" in it as it looks like VRA converts a "/" into "%2f" and will fail to find the network profile correctly. :)
DeleteThanks for the reply. Yep you can use custom properties or use vRO to manually create the drop downs. I assume you want the drop downs for IPAM and not for vRA NP?
DeleteThanks for the post.
ReplyDeleteWhen I tried everything is working except "Update IPAM Records" workflow.
Looks like you are using event broker -> subscription. For me, I am getting "vRA VM not initialized" error.
Any idea?
It was very detail information screen shot, I appreciate your effort for providing this service. Thank you for sharing it with us
ReplyDeleteWebsite Security Certificate | SSL certificate Prices | SSL Certificate Integration Service
Great Post! I am using vRA7.3 with Infoblox. I followed up your post. When I use blueprint to create VM, I can get IP allocated from Infoblox and VM created but soon the newly created VM is decomissioned from vCenter and allocated IP is released. I see the following error:
ReplyDelete"vRealize Orchestrator workflow WFStubBuildingMachine failed with error: You must have at least one properly configured vRealize Orchestrator endpoint that is reachable"
Any clue?
Note: i can create VM with blueprint without any issue if I use vRA Built-in IPAM
My vRO is embeded in vRA.
Looks like vRO is looking for some specific property in a specific way. You might want to check the vRO configurations and custom properties.
ReplyDeleteI'm receiving this error, please help!
ReplyDelete[E] (com.infoblox.ipam/updateTenantName) Error in (Dynamic Script Module name : updateTenantName#1) An error has occurred while updating the tenant name. Detail: The requested tenant with ID [abcdfg] was not found. The tenant may be missing or you may lack permissions to query the tenant. Check your NIOS configuration.
Useful post.
ReplyDeleteSpring Training in Chennai
I have found that this site is very informative, interesting and very well written. keep up the nice high quality writing. Cloud Workflow
ReplyDeleteThank you for posting such a great blog. I found your website perfect for my needs. Read About Cloud Workflow
ReplyDelete